Using the Markup Commands
The Markup menu supplies various commands that allow you to add changes, comments, and suggestions to a drawing or to specific areas of a drawing. To open the Markup menu, select Markup from the Menu bar.
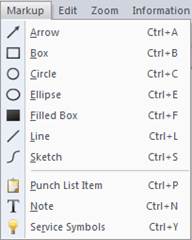
From the Markup menu select the command you want to perform. They include:
· Arrow
· Box
· Circle
· Ellipse
· Filled Box
· Line
· Sketch
· Punch List Item
· Note
· Service Symbols
Arrow
Use the Arrow command to indicate a point of the drawing that is to be noted.
To Use the Arrow Command
1. Select Markup ® Arrow.
2. Place your cursor where you want to start the arrow.
3. Click and drag the cursor to indicate the length of the line and the point of the arrow.
Box
Use the Box command to surround an area of the drawing that is to be noted.
To Use the Box and Filled Box Command
1. Select Markup ® Box.
2. Place your cursor where you want to position one corner of the box.
3. Click and drag the cursor until the box is the size you want.
Circle
Use the Circle command to surround an area of the drawing that is to be noted.
To Use the Circle Command
2. Place your cursor where you want the center point of the circle to be.
3. Click and drag the cursor until the circle is the size you want.
Ellipse
Use the Ellipse command to surround an area of the drawing that is to be noted.
To Use the Ellipse Command
1. Select Markup ® Ellipse.
2. Place your cursor where you want the ellipse to begin.
3. Click and drag the cursor until the ellipse is the size you want.
Filled Box
Use the Filled Box command to surround an area of the drawing that is to be noted.
To Use the Box and Filled Box Command
1. Select Markup ® Filled Box.
2. Place your cursor where you want to position one corner of the box.
3. Click and drag the cursor until the box is the size you want.
Line
Use the Line command to indicate an area of the drawing that is to be noted.
To Use the Line Command
1. Select Markup ® Line.
2. Place your cursor where you want to start the line.
3. Click and drag the cursor to indicate the line length.
Sketch
The Sketch command allows you to use free-hand drawing on the drawing area.
To Use the Sketch Command
1. Select Markup ® Sketch.
2. Place your cursor where you want to start drawing.
3. Click and drag the cursor to sketch the shape that you want.
Note:
· When using the Circle, Ellipse, Line, and Sketch commands, SoftPlan reView allows you to select the thickness and color of the Markup item.
· If you want to use a different thickness and/or color, select the new thickness and/or color before you use the Markup command.
To Select the Thickness of a Markup Command
1. Select the
Markup Thickness icon ![]() from the Toolbar. The following menu opens:
from the Toolbar. The following menu opens:
![]()
2. Select the thickness you want to use. This thickness will then be used for the Markup commands until you change it.
To Select the Color of a Markup Command
1. Select the
Color box ![]() from the Toolbar. The following menu opens:
from the Toolbar. The following menu opens:
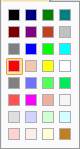
2. Select the color you want to use. This color will then be used for the Markup commands until you change it.
Adding Punch List Items, Notes, and Service Symbols to SoftPlan reView Drawings
Punch List Items, Notes, and Service Symbols can be added to reView drawings.
· The Punch List Item command is particularly valuable during final inspections. It is customizable to allow you to include all possible inspection findings. For example: broken windows, nail pops, paint overspray, broken appliances, scratched surfaces, and so on.
· Use the Note command to add notation for the drawing or to an area of the drawing.
· The Service Symbols command is used to specify the placement of services, such as electrical outlets and switches, telephone, cable and so on.
Punch List Items, Notes, and Service Symbols are added to reView drawings using the same method.
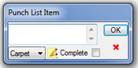
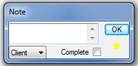
To Add a Punch List Item, Note, or Service Symbol to a reView Drawing
1. Select Markup ® Punch List Item / Note / Service Symbols.
2. Click on the screen where you want to place the punch list item, note, or service symbol. A color coded symbol is placed to indicate the item's position and the Punch List Item / Note / Service Symbols menu opens:
Note:
The symbol indicating the position of a service symbol can be changed in color. Select the new color before selecting the Service symbol's position.
To learn how to select a new color, see a previous section To Select the Color of the Markup Command.
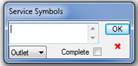
3. From the drop-down menu (bottom left field), select the item or person that the note pertains to.
4. In the Comment
field (top field), enter the information or instructions that you want to relay
for that item or person, or select from a list of currently available standard
comments. To display these comments (see the sample Comment list below), click
on the ![]() icon displayed at the bottom of the
menu.
icon displayed at the bottom of the
menu.
Note:
The ![]() icon is not displayed if standard comments are unavailable.
icon is not displayed if standard comments are unavailable.
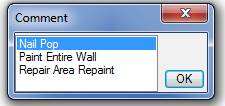
Illustration 1: Sample Comment List
5. If you have selected from the Comment list, click ok to enter the comment in the Comment field.
6. If the markup item is a punch list item or a service symbol, you can choose the symbol you want to use to indicate its position. To do this:
i Click on the current symbol choice displayed on the bottom right corner of the Punch List Item or Service Symbols menu. A list of the symbol choices is displayed:
![]()
Illustration 2: Symbol List
ii. From the list, choose the symbol you want to use.
7. The Complete field can be checked to indicate that the information or instructions have been noted and/or completed.
8. Select ok to close the menu. If the markup information is a Note, an information menu appears on the screen beside its symbol. Illustration 3 shows a sample Information menu for a Note item.

Illustration 3: Note Information Menu
If the markup information is a punch list item or a service symbol, just the item's location symbol is visible on the screen.
Note:
· To display the Information menu for a Punch List Item or a Service Symbol, click or right-click on the item's location symbol (see Illustration 3) or use the Select command as described in the following section, Using the Edit Commands.
Illustration 4 shows a sample Information menu for a Punch List item.

Illustration 4: Information Menu
· To temporarily turn off an Information menu, click the X displayed on its header. See Illustration 4.
· Once displayed on the screen, these Information menus remain visible until they are turned off.
· To move an Information menu to another location on the screen, click on the header (see Illustration 4), and then drag the menu to its new position.
Note that the item's location symbol does not move with the information. If needed, use the Move command as described in the section, Using the Edit Commands to move the position symbol.
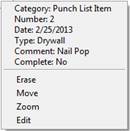
· If you click on the Item information section of the menu (see Illustration 4), a more detailed information menu for the item appears, for example:
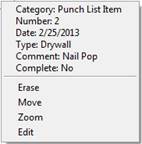
Use this menu to review information for the Punch List Item, Note, or Service Symbol. It describes:
– What Category of information is being displayed: Punch List Item,
Note, or Service Symbol.
– The Number placement of the particular information, for example
the above punch list item was the 1st punch list item placed on the
reView drawing.
· Note that multiple punch list items,
notes, and service symbols can be placed on a reView drawing.
– The Date the information was placed on the drawing
– Who the
information is for or what the information or instruction pertains to
– The Comment (information or instruction) relayed
– Whether or
not the information or instruction has been noted and/or completed
You can also use this menu to modify information for the Punch List Item, Note, or Service Symbol. For more information on modifying a Punch List Item, Note, or Service Symbol, see the Select command in the following section Using the Edit Commands.
Using the Edit Commands
The Edit commands allow you to Erase, Move, Undo, and Redo information added to a reView drawing.
· You can not use the Edit commands to change the original drawing information that was exported into SoftPlan reView.
To open the Edit menu, select Edit from the Menu bar:
From the Edit menu select the command you want to perform. They include:
Erase
Use this command to erase information that has been added to a reView drawing.
To Use Erase
1. Select Edit ® Erase or
press the Erase button ![]() on the Toolbar.
on the Toolbar.
2. Click on the item you want to remove.
Move
Use this command to move information that has been added to a reView drawing.
To Use Move
1. Select Edit ® Move or
press the Move button ![]() on the Toolbar.
on the Toolbar.
2. Click and drag the item to its new location.
Undo
Use this command to undo the
last consecutive operations since the drawing was opened. To perform an
Undo, select Edit ® Undo or press the Undo button ![]() on the Toolbar.
on the Toolbar.
Redo
Use this command to redo the
last consecutive Undos since the drawing was opened. To perform a Redo,
select Edit ® Redo or press the Redo button ![]() on the Toolbar.
on the Toolbar.
Using the Zoom Commands
While working with SoftPlan reView, you may want to view the whole drawing or to magnify details. SoftPlan reView supplies several Zoom commands to create quick alternate views.
To Select the Zoom Commands
Select Zoom from the Menu bar to display the list of Zoom commands:
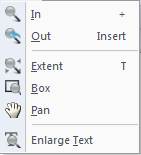
Use the following Zoom Commands to view your drawings:
· In
· Out
· Extent
· Box
· Pan
· Enlarge Text
Zoom In
Select Zoom ® In or press the PLUS (+) key to progressively zoom in closer to magnify your work.
Zoom Out
Select Zoom ® Out or press the INSERT key to progressively zoom out to view larger portions of your work.
Select Zoom ® Extent or press the T key to display everything you have drawn on the screen.
Box
The Box command creates a window that adjusts from the corner-out. Size the window around the portion of the drawing you want to view.
To Use the Box Zoom Command
1. Select Zoom ® Box.
2. Place the cursor on a corner of the area you want to view.
3. Click and drag the cursor to surround the area of the drawing you want to view.
Note:
You can also select the Zoom Box button ![]() on the Toolbar to access this command.
on the Toolbar to access this command.
Pan
Use this command to move the viewing screen in order to view a particular portion of the drawing.
To Use the Pan Command
1. Select Zoom ® Pan.
2. Place your cursor on the drawing area at the point where you wish to change the viewing position.
3. Click and hold the Left mouse button.
4. Drag the screen
to the desired view.
Note:
· If there is a middle button or a scroll wheel on your mouse, you can use it to reposition the viewing screen. If you use this method to pan, it is not necessary to select the Pan command.
· You can also
select the Pan button ![]() on the Toolbar to access this command.
on the Toolbar to access this command.
Enlarge Text
By default, the notes and dimensions on the SoftPlan reView drawings are displayed in the size, font, and proportion as originally specified. If you want them to be displayed in an enlarged, simple font for easier reading at any zoom magnification level, select Zoom ® Enlarge Text.
Note:
To once again display the originally specified text, select Enlarged Text to remove the check.
Users who have a mouse with a scroll wheel can use it to zoom in and out to see areas of the drawing. To zoom in, position the cursor over the area you want to view and then move the scroll wheel upward. To zoom out, position the cursor over the desired area and move the wheel downwards.
If you use this method to zoom in and out, it is not necessary to select the Zoom command.
The Information commands allow you to calculate distance, view important item information, and toggle panorama hotspot visibility.
To Select the Information Commands
Select Information from the Menu bar to display the list of Information commands:
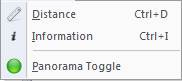
Use the following Information Commands to view your drawings:
· Distance
· Information
· Panorama Toggle
Distance
The Distance command allows you to automatically calculate the distance between two lines on a reView drawing, and place a temporary dimension line between them.
To Use the Distance Command
1. Select Information ® Distance.
2. Click and drag the cursor across the first line.
3. Drag the cursor to cross over the second line. A temporary dimension line showing the distance between the two lines is displayed.
Note:
· If the two lines dimensioned are parallel, a perpendicular dimension line showing the distance between the two lines is displayed.
· If the two lines are not parallel, an angled dimension line is drawn showing the distance between the two lines at the points you selected.
Information
Use this command to view detailed information about any item on a reView drawing. To do this:
1. Select Information ® Information.
2. Click on the item you want to view information for. If more than one item is located at a particular point, a menu appears listing the items located there, for example:
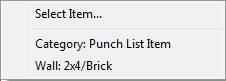
3. From the menu, select the item to view. For example, Category: Punch List Item. An Information menu about that item opens. For example:
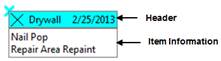
Illustration 3: Information Menu
· To temporarily turn off an Information menu, click the X displayed on its header. See Illustration 3.
· Once displayed on the screen, Information menus remain visible until they are turned off.
· To move an Information menu to another location on the screen, click on the header (see Illustration 3), and then drag the menu to its new position.
· If you print a reView drawing, any currently displayed punch list item, note, or service symbol Information menus, or information menus for fixed items on the reView drawing will be printed with the drawing.
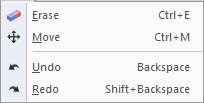
· If the item selected is a punch list item, a note, or a service symbol, you can display commands that allow actions to be performed on it. To do this, click on the Item Information part of the menu (see Illustration 3) or right-click on any part of the menu. A more detailed Information menu opens, and the Erase, Move, Zoom, and Edit commands become available:
– If you select Erase, the item is erased.
– For more information on Move, see the previous section.
– If you select Zoom, SoftPlan reView zooms in on the item and centers it on the drawing screen.
– If you select Edit, the original menu for the item opens, for example Punch List Item, Note, or Service menu, allowing you to make changes to the item.
· If the item selected is a markup item (circle, ellipse, line or sketch), the Erase, Move, and Zoom commands become available when the item is first selected.
· If the item selected is part of the fixed SoftPlan reView drawing, no action can be performed on it. It is there for reviewing only.
Note:
You can also select any item from the reView drawing by right-clicking on it.
Panorama Toggle
The Panorama Toggle command allows you to
toggle the panoramic hotspot visibility of the reView drawing. Once selected,
the floor plan changes into a top-down view of the drawing. Green dots in this
view denote panoramic views that can be double-clicked to open a new tab of the
selected panorama.
To Use the Panorama Toggle Command
1. Select Information ® Panorama Toggle.
2. In the new top-down view, double-click the panorama hotspot you wish to view.
3. In the panoramic view tab, use the mouse and scroll wheel to pan and zoom within the panorama.
4. To turn off the panoramic hotspot visibility and return to the plan view, select the command again.
Adding Markup to the Various Modes of a reView Drawing
SoftPlan reView allows you to add information to different modes. These modes include: Drawing, Floor System, Ceiling, Area, Framing, Roof, Site, Interior, Electrical, reView, Room, 3D, Custom 1, Custom 2, Custom 3, Custom 4, Custom 5, and SoftList mode. The Drawing mode is the default mode for displaying reView drawings. If necessary, select a different display mode in order to add markup information (comments, suggestions, and modifications) to a drawing in that specific mode.
To Select another Display Mode
1. Select Drawing Mode from the Menu Bar. A menu of the different display modes opens:
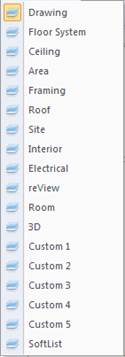
2. Select the mode you need from the menu. The drawing is redisplayed in that mode.
3. Add the necessary markup to the drawing.
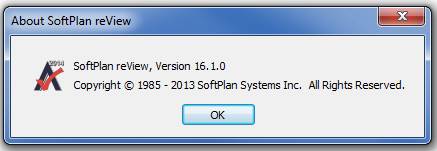
Displaying the Version Number of SoftPlan reView
At times you may want to know what version of SoftPlan reView you are using. To do this, select Help ® About. A message is displayed showing the current version of SoftPlan reView:
Using SoftPlan+ to Publish Projects to reView
SoftPlan+ subscribers can publish drawings and panoramas
directly to the SoftPlan+ cloud drive that can be opened in SoftPlan reView.
Note:
The SoftPlan+ Publish function is only visible to SoftPlan+ subscribers.
To Publish a reView File Using SoftPlan+
1. Select File ® SoftPlan+ Publish ® reView. The Publish reView Project menu opens:

2. Select the types of files you want to update and publish: Drawings and/or Panoramas.
If you wish to update or edit the recipient list for an already published project, place a check in the box for Modify recipient list without republishing.
3. Select Next. A new menu opens:
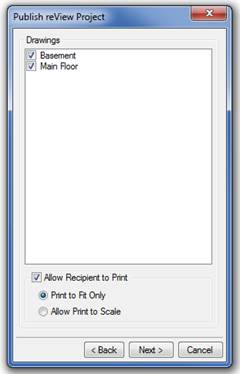
4. Select the
project drawings you wish to include in the publishing.
·
If you
want the recipient to be able to print the drawing in reView, check Allow
Recipient to Print.
Once checked, you can further specify where
the reView user can:
– Print
the drawing to fit the current print page size only (Print to Fit Only), or
– Print
the drawing at any scale (Allow Print to Scale).
5. Select Next.
A new menu opens:
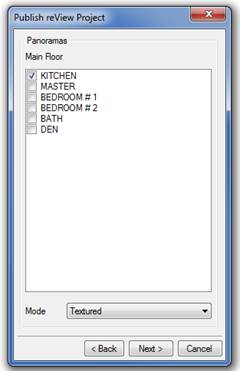
6. Select the panoramic views you wish to
include in the publishing. These panoramas are automatically generated using
the 3D views of rooms specified in Room
Mode in the SoftPlan project.
·
Panoramas
can be viewed in any of the 3D modes. After selecting the panoramas to be
published, select which mode you want them to be viewed in.
7. Select Next.
The final menu opens:
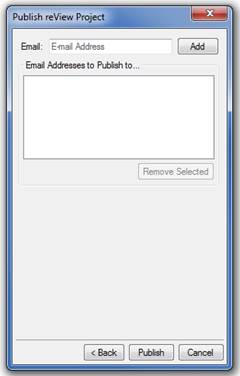
7. Enter the email address that is to receive
the published reView files and click Add. Additional addresses can be
added in this way to create a recipient list. If an address needs to be removed
from the recipient list, select the address and click Remove Selected.
8. Click Publish.
The files are emailed to the recipient
and can be opened in the SoftPlan reView viewer, which can be downloaded at www.softplan.com. Once the viewer is opened,
the SoftPlan+ Sign In menu appears
prompting you to login to SoftPlan+.
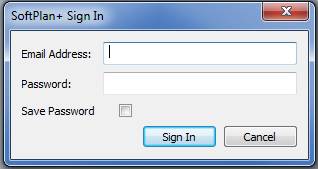
Once signed in to SoftPlan+, the published drawings,
panoramas, and 3D models can be viewed and marked up in the reView viewer.
Using the SoftPlan reView App on an Apple iOS Device
In addition to your PC, SoftPlan reView drawings and
panoramas can be viewed and marked up from your iPhone and iPad using the
SoftPlan reView app, available from the Apple iTunes Store: https://itunes.apple.com/us/app/softplan-review/id592417533?ls=1&mt=8
1. Begin by opening the reView app. You are prompted to
enter your SoftPlan+ login information with an option to save your password.
When you are done entering your email and password, tap Sign In.
2. On the next screen, select the project you want to
view from the SoftPlan reView Projects list. Tap the blue arrow icon to
access the Plans screen and select a particular component of the project. To
open directly to the project’s floor plans, simply tap the name of the project.
A project can be downloaded to the device to create an offline
backup that can be accessed locally. This allows you to view your projects
without a data connection.
i.
To do this, press
the Manage
Offline Content button in the top right corner of the SoftPlan reView Projects screen.
Note:
On iPhones,
the device must be turned horizontal to view the Manage
Offline Content option.
ii.
Next, locate the
project you want to download and press the Make Available Offline button. The
blue download bar indicates the download progress.
iii.
Once a project is
downloaded, it can be accessed offline. An Offline Backup icon replaces the Make Available Offline button to
indicate the project’s offline status.
iv.
To update or
delete the offline backup of a project, press the Offline Backup icon that corresponds to the project and select Update
or Delete.
3. If you tapped a project’s blue arrow icon on the SoftPlan reView Projects screen, you
will access the SoftPlan reView Plans screen. On the Plans screen, select to
view either plans or panoramas. If you tap a blue arrow icon here, you can
select a specific plan or panorama to view.
Using the reView App Touchscreen
There are a few different methods for navigating reView drawings using the device’s touchscreen:
· Use a single finger to pan the drawing.
· Use two fingers pinching together and away to zoom in and out.
· To access a different drawing in the project, swipe two fingers in the direction of that drawing. The dots above the Toolbar represent the drawings in the project. The dot representing the current drawing is black while the other dots are gray.
·
With all the tools turned off, touching an item
or room in the drawing accesses a window that provides detailed information on that item or
room.
Using the reView App General Commands
When viewing 2D floor plans on the reView app, a
scroll wheel listing several commands is located under the plan. Use the
following commands to modify or add information to the plan:
Projects Folder
Tap the Projects
Folder icon to return to the Projects page.
Toggle Panoramic Hotspot Visibility
Tap the Toggle
Panoramic Hotspot Visibility icon to change the floor plan into a top-down
view of the drawing. Green dots in this view denote panoramic views that can be
tapped to open. For more information, see the topic Toggle Panoramic Hotspot
Visibility.
Drawing Mode
Tap the Drawing
Mode icon to select the mode in which you want to mark up the drawing. When
a new mode is selected, the drawing is redisplayed in that mode. Tap the Drawing Mode icon again to turn off the
mode selector.
Color
Tap the Color icon to select the color you want
to use for the Markup commands.
Distance
Tap the Distance icon to turn on the Distance command and then select two points on the drawing to automatically calculate the distance and place a temporary dimension line between them.
Using the Markup Commands in the SoftPlan reView App
The Markup commands allow you to add changes, comments, and suggestions to a drawing or to specific areas of a drawing.
Note:
· To use a command one time, tap the icon once (gray box). The command turns off after one use. To use a command multiple times in a row, tap the icon again (blue box). The icon must be tapped once more to turn it off after multiple uses.
Line
Use the Line command to indicate an area of the drawing that is to be noted.
To Use the Line Command
1. Tap the Line icon to turn on the Line command.
2. Press your finger where you want to start the line.
3. Drag your finger the desired distance on the drawing to indicate the line length.
Sketch
Use the Sketch command to free-hand draw custom mark ups.
To Use the Line Command
1. Tap the Sketch icon to turn on the Sketch command.
2. Press your finger where you want to begin sketching.
3. Move your finger to create the desired shape.
Arrow
Use the Arrow command to indicate an area of the drawing that is to be noted.
To Use the Line Command
1. Tap the Arrow icon to turn on the Arrow command.
2. Press your finger where you want to start the arrow.
3. Drag your finger the desired distance on the drawing to indicate the arrow length.
Box
Use the Box command to surround an area of the drawing that is to be noted.
To Use the Box and Filled Box
Command
1. Tap the Box icon to turn on the Box command.
2. Press your finger where you want to position one corner of the box.
3. Drag your finger until the box is the size you want.
Filled Box
Use the Filled Box command to surround an area of the drawing that is to be noted.
To Use the Box and Filled Box
Command
1. Tap the Filled Box icon to turn on the Filled Box command.
2. Press your finger where you want to position one corner of the box.
3. Drag your finger until the box is the size you want.
Circle
Use the Circle command to surround an area of the drawing that is to be noted.
To Use the Circle Command
1. Tap the Circle icon to turn on the Circle command.
2. Press your finger where you want the center point of the circle to be.
3. Drag your finger until the circle is the size you want.
Ellipse
Use the Ellipse command to surround an area of the drawing that is to be noted.
To Use the Ellipse Command
1. Tap the Ellipse icon to turn on the Ellipse command.
2. Press your finger where you want the ellipse to begin.
3. Drag your finger until the ellipse is the size you want.
Punch List Item / Note / Service Symbol
Punch List Items, Notes, and Service Symbols can be added to reView drawings.
· The Punch List Item command is particularly valuable during final inspections. It is customizable to allow you to include all possible inspection findings. For example: broken windows, nail pops, paint overspray, broken appliances, scratched surfaces, and so on.
· Use the Note command to add notation for the drawing or to an area of the drawing.
· The Service Symbols command is used to specify the placement of services, such as electrical outlets and switches, telephone, cable and so on.
To Use the Punch List Item /
Note / Service Symbol Commands
1. Tap the Punch List Item / Note/ Service Symbol icon to turn on the respective command.
2. Touch on the screen where you want to place the punch list item, note, or service symbol. A color coded symbol is placed to indicate the item's position and a menu opens.
3. From the Type field, select the item or person that the note pertains to.
4. Use the Comment field to enter the information or instructions that you want to relay for that item or person.
5. The Complete field can be changed from No to Yes to indicate that the information or instructions have been noted and/or completed.
6. Use the Symbol field to choose the symbol you want to use to indicate the item’s position.
7. Tap Done when you have finished.
For more general information, see Adding Punch List Items, Notes, and Service Symbols to SoftPlan reView Drawings.
Using the reView App Edit Commands
The Edit commands allow you to Erase and Move items from the drawing. You can use the Markup Thickness command to change the line thickness of the Markup commands.
Erase
Use this command to erase information that has been added to a reView drawing.
To Use Erase
1. Tap the Erase icon to turn on the Erase command.
2. Tap on the item you want to remove.
Move
Use this command to move information that has been added to a reView drawing.
To Use Move
1. Tap the Move icon to turn on the Move command.
2. Touch and drag the item to its new location.
Markup Thickness
Use this command to
select the thickness for Markup commands.
To Select the Thickness of a
Markup Command
1. Tap the Markup Thickness icon to access the thickness gauge.
2. Select the thickness you want to use.
Viewing Panoramas
3D panoramic views can be viewed in the SoftPlan reView app. These panoramas can be panned and zoomed using the standard touchscreen commands. Panoramic views can also be oriented using the Gyroscope.
To Open a Panorama
1. From the plan screen, press the Toggle Panoramic Hotspot Visibility icon to view the panoramic hotspots that were published with the reView drawing.
Note:
Panoramas can also be accessed directly from the SoftPlan reView Plan screen.
2. Touch to select the panoramic hotspot you want to view. The panorama opens.
Note:
Touching the screen once will hide the Panorama Bar at the top of the screen. Touching the screen again will unhide the bar.
3. To orient the panorama using the Gyroscope, press the Gyroscope button at the top of the screen to turn the gyroscope on. To turn the gyroscope off, press the button again.
4. With the gyroscope turned on, rotate and position the iOS device up, down, left, and right to orient the panorama as if standing from a fixed position within the model and turning to any angle.
Note:
A panorama can still be navigated using the standard touchscreen commands while the gyroscope is turned on.